|
|
| Articles |
Arne 06-29-2023 11:37 PM
Like most modern cars and for better or worse, the 718 line is heavily computerized. Conventional wisdom is to simply let it be, rather than risk breaking something. But with some care, a little bit of tech savvy-ness, and an appropriate tool there is a surprising number of things you can change using options that are already built in to the system, but are hidden. The two most common tools to make coding changes on a 718 are the PIWIS3 clones or the Launch X431 tool line.
I bought a Launch...
16 Comments
Heater Guy 10-14-2016 10:50 PM
These are photos of the attachment between the outer door handle and lock assembly.
To disconnect the ouster door handle from the lock:
The black plastic piece is a slider. Press it and slide it back. This will expose the threaded shaft which can then be separated from the white plastic connection. To reinstall, snap the threaded shaft into the white plastic connector and slide the black plastic slider forward to lock the two pieces together.
Rob VN 01-17-2015 11:22 AM
Most of these photos were created and annotated by adsalmon as he trouble shoots a delayed cold start problem on his 2006 Cayman S. Very handy reference.
1 Comments
Gator Bite 04-04-2018 10:24 AM
A question came up in a discussion about testing Relays. Relays seem like magical little boxes of wonder. They often catch the blame for mysterious electrical gremlins because they're operation is a mystery to most auto enthusiasts. But if we really stop to learn what a relay is and how it works, we will learn that they are really quite simple. Understanding and being able to test them can help us cross them off the list when things go wrong. So let's take a lesson on Relays, how they work and...
8 Comments
Boiler Inspector 08-02-2015 11:00 AM
This article shows you how to remove the front bumper cover. Why might you need to remove the front bumper cover? Several reasons come to mind, such as installation of third center mounted radiator, getting your front bumper repainted, or the reason for this article, cleaning out the debris from the radiators as a matter of routine maintenance.
Here are the tools necessary for this evolution:
1/4" drive ratchet
T-30 socket & ratchet or L-shaped wrench
T-25 socket & ratchet or L-shaped...
Rob VN 05-03-2013 07:58 PM
This article discusses the installation of Torque Solutions sport trans axle mounts into my 2007 Cayman 2.7L. The sport mounts keep the trans axle from moving around as much as the stock mounts and tightens up the handling of the car. The down side is that more NVH is introduced into the cabin. I am pleased to report the increase is tolerable and no where near the NVH the sport engine mount introduced into the cabin. You sense more of what the engine is doing on deceleration and various RPMs....
5 Comments
Rob VN 11-04-2013 03:54 PM
UPDATE 2 from Vision Motorsports:
Dwain replied to my question about trans axle temperature ranges to worry about: his response was, 220 is ok. 250 is getting hot. 275, I would start to be concerned.
UPDATE:
I have some trans axle temp data from my recent visit to Sebring.
On the drive over, 140 miles at 55 - 65 MPH, ambient air 90 F, the trans axle oil reached 150 F. The first day of the DE air temp was 80 F and I was re-learning the track the trans axle oil reached 190 F. On the...
Croc'ed 03-19-2010 06:19 PM
I recently removed the Brey-Krause model R-2035 fire extinguisher mounting bracket from the manual sport driver's seat of my 2007 Cayman. From left-to-right, the attached photographs show various stages of disassembly, with the final two photos showing top and bottom views of the assembled pieces.
The trickiest part of the installation, aside from removing and installing the HEAVY factory seats, is sliding the flat plate (containing the welded nuts) underneath the seat cushion springs and...
1 Comments
OldGoat5 03-03-2021 09:36 AM
I couldn't find the 981 PDLS Bi-Xenon bulb change video of my dreams, so I filmed it myself.
EPtCB2sFuGU
5 Comments
lithium1330 12-19-2012 12:39 PM
IMPORTANT NOTICE!: The US National Highway Traffic Safety Administration (NHTSA) has done extensive research and found that Tire Pressure Monitoring Systems (TPMS) reduce highway fatalities. Federal laws/codes require all passenger vehicles of <10,000 lbs. GVWR produced on or after September 1, 2007 to include TPMS and prohibits the act of disabling it. Applying the alteration contained below to a car that is registered for street use may violate Federal and/or State Motor Vehicle Safety Laws,...
2 Comments
Rob VN 04-17-2013 06:11 PM
This article describes the installation of a CAE Ultra Shifter, Model number 10013ST into my 2007 Cayman 2.7L with 5 speed. This is a hard core shifter that does not retain the stock shifter look like the Numeric short shifter and others. The reverse lockout feature is inoperable with the 5 speed but works with the 6 speed trans axle. A link to the manufacturer product website is here http://www.shop.cae-racing.de/index.php?a=25&lang=eng The CAE unit is made in Germany and was obtained from...
2 Comments
Gator Bite 03-23-2018 05:38 PM
In Germany, every new Porsche is delivered with a set of Emergency Triangles and a First Aid Kit. Those of us who opted to do a European Delivery were surprised to receive these cool little safety devices at delivery. These are cool little keep sakes that I'd like to hang on to, and as the German TUV knows, it's not a bad idea to have these in your car.
The First Aid kit fits nicely into the storage box in the trunk, but the triangles won't fit there. European cars have a nifty little set...
4 Comments
Gator Bite 10-06-2014 09:55 AM
It seems one of the more common failures we see in our Cayman cars are the horns. I know I've had one horn failure in my 2007 and recently Retired Teach had his third horn failure in his 2008. Changing the horns is a relatively easy job, but it does require the removal of the front bumper cover, which makes it a lot less easy and means that you can count on a pretty expensive repair bill if you take your car to the dealership.
Gonzo and I offered to help Retired Teach swap out his horns,...
2 Comments
Rob VN 08-25-2012 03:59 PM
This article describes the installation of an external air to oil cooler on my 2007 Cayman 2.7L. The cooler is mounted on the left side of the trans axle with air from under the car fed to the cooler. I want to keep my engine oil temperature as close to 200 degrees as possible during hard driving on the track in sunny FL and gain some additional oil pressure promised by the deletion of the stock oil cooler. The major elements of this install are a Setrab single fan pack & mounting kit, 180...
3 Comments
pcormier 05-19-2018 03:30 PM
The two plastic trim strips under the front hood, are attached to the body with three pieces of velcro. My 8 year old 2010 987.2 trim strips were flapping due to the velcro giving up.
The velcro was done sticking to stuff...
I spent some time researching high-temp automotive grade velcro. This is mainly why I'm posting this, as well as some advice after replacing it myself.
I ordered the velcro from Amazon, here is a link that will certainly expire.
... and the details that...
4 Comments
Arne 04-10-2022 07:26 PM
I recently added aftermarket grill screens to the front bumper and side intakes on my 2018 Cayman. I bought the whole set from The Radiator Grill Store (frequent Panorama advertiser, look for the PCA discount code in the magazine ads). These are definitely a DIY project, but there are a couple of things I found that were not documented in the instructions.
The fronts are the easy ones, and the instructions on the website (downloadable PDF) are reasonably accurate. No removal of anything...
9 Comments
Rob VN 01-01-2012 03:43 PM
I managed to snap off two of the studs that hold the plastic under tray onto my Cayman.
I dropped the three center under trays to start the repair because there was a broken stud on each side. The dealer and their technicians don't bother to repair broken studs and don't sell any replacement parts. Surfing the web led me to the ClickBond adhesive attached threaded studs used in maritime and aerospace applications for cable tiedown points. The ClickBond part number is CS125-1024-CR. The...
8 Comments
lithium1330 06-28-2012 09:09 PM
Laser Interceptor (LI) Laser Jammer Installation Procedure on 987
You can download the PDF version here:
https://www.box.com/s/089dec34accb6d66be3d
The write up applies to 987 (boxster & cayman), but should also be applicable to the 997 cars - just about all the components I worked with in this guide are from the 997 parts bin (i.e., they have 997 part numbers). This document also assumes you have basic knowledge working with automotive electronics, handy with tools and have standard...
4 Comments
tdweldercs 05-11-2015 05:06 PM
P0455 error, leak inevaporative system
2006 Cayman S
There is a lot of informationfor this error code for earlier Boxsters and other models that focus on ventline valve near the fuel filler neck and/or vent lines at the charcoalcanister (carbon canister), but, unfortunately, most of this information didnot apply to my car.Since I could notfind this information when I searched here before, I thought I would do a shortwrite-up for other Porsche novices.
I am new to Porsches in general...
6 Comments
Gator Bite 05-08-2011 03:26 AM
Removing the Headlight Switch
1. With the headlight switch in the full off position, press the control knob in
2. While holding pressure inward, rotate the control knob clockwise 5 degrees until it stops.
9 Comments
Gator Bite 05-08-2011 02:59 AM
Removing the Cargo Bar and Trim
1. Slide the Cargo Bar caps up the Cargo Bar
2. Remove the two 8mm 12 point bolts and Cargo Bar
Rob VN 08-04-2014 10:06 AM
This article describes the installation of the Tarett Engineering rear strut mounts ( no affiliation ) shown below. Because this install was part of a suspension upgrade I had the struts already out of the car. There are many articles out there describing the strut removal process in a Cayman or Boxster if your struts are in place. Access to the top of the rear struts require a fair amount of interior trim removal. You will need an impact driver with 13/16 socket and a spring compressor for...
2 Comments
CrocZilla 06-29-2011 10:11 PM
While installing my Fire Extinguisher mount, I found that the procedure needed on my power seats is somewhat different than that needed for mechanical seats. I thought it would be a good idea to highlight and share the differences.
NOTICE: This guide is ONLY for the driver's side power seat removal. Passenger seat removal & replacement requires recalibrating the Auto Weight Sensor.
I installed the Rennline mount but the specifics on installing this mount will not be discussed since it...
7 Comments
reiver 12-01-2021 08:03 PM
Changing the plugs was really very easy in my manual 718 and can't imagine it'd be any more dif in a PDK. With the wheels off and the car on stands everything is right there in front of you. Here is the drivers side and all one does in unscrew the plug boot/coil units (the screw is captive and stays with the unit) and pull it out of the way. The access to the plug requires a 12 point magnetic plug socket w/ universal joint.
The 14 mm mag plug (thin) is available here...
6 Comments
babbo 10-25-2010 01:36 PM
Topeak Mega Morph Folding Floor Pump
I use a floor pump in the garage to inflate car tires. Call me a Luddite, but I prefer the speed, mechanical directness, exercise and lack of noise a floor pump offers. For adjusting pressures at the track and as part of my emergency kit (see also my article on carrying a spare tire in this section) I always take a smaller version with me on the road.
Recently I found this pump (PICTURE 1) which folds flatter and takes up less space than the...
12 Comments
Rob VN 03-15-2014 01:04 PM
This article describes the installation of a set of Hella B133 horns into my 2007 Cayman. My car is on its third set of stock horns so I wanted try something better(?) now that the warranty has expired. This horn installation requires the bumper cover to be removed. I synced this project up with my CSF radiator install.
The Hella kit comes with two horns and a horn relay. I used the relay not knowing the capacity of the Porsche horn relay. These new horns draw 11 Amps....
Here is the...
1 Comments
steved0x 06-19-2018 08:56 AM
I've used several different systems as I like to tinker (this post is mostly a copy/paste from another post I made on another forum, with the exception of this intro) - I have no affiliation with any of these vendors - these are just my experiences with some links added for convenience.
If you already have a really good camera (GoPro) and you want to provide data, and also use the data for driving improvement, I am liking my current combo of AIM Solo DL + camera, and I use the free Dashware...
2 Comments
Gator Bite 01-20-2015 07:42 AM
I don't know of a single Throw-Out bearing that has failed in a Cayman. I decided to replace mine because of an IMS cover leak, which required me to remove my transmission, clutch, pressure plate and flywheel. Because my car had 80,000 miles on it at the time, it seemed sensible to freshen up the clutch package, which meant a new throw-out bearing too.
Once the transmission is out, changing the Throw-Out bearing is a simple operation.
1Torque Values
Fastener LocationDescriptionTool...
6 Comments
Gator Bite 05-09-2011 08:50 AM
Preliminary Procedures
Remove the Headlight Switch
Remove the Driver Side Center Console Cover
1. With driver door open, slip a panel tool under the left side dash cover and pry outward to release the cover.
Rob VN 02-06-2014 08:17 PM
This article briefly describes the installation of a brake caliper stud kit supplied by Tarret Engineering ( no affiliation ) on the rear of my 2007 Cayman. The stud kit prevents stripping of the caliper mounting holes in the wheel bearing carrier. The studs are available in various lengths for different vehicles as shown here: http://www.tarett.com/items/986-987-products/986-987-engine~transmission~brakes~electrical/brake-caliper-stud-kit-bcsk-detail.htm
The kit is shown here.
The...
1 Comments
greenfrog 08-28-2015 10:55 PM
The greenfrog (Cayman R) is hitting 222F (coolant) and 252F (oil) at VIR on a 90F+ day, so it's time to add some more cooling. The center radiator installation is well documented and straight forward. Flushing the whole cooling system is much messy and requires special tool (UView Airlift 550000) to refill. In addition there are some differences between 987.1 and 987.2 water pumps.
Here are some of the articles and forum threads I researched:
...
17 Comments
dhudso01 05-27-2013 05:12 PM
When I changed my clutch and was putting everything back together, I found that my drivers side shift linkage did not snap onto the ball on the trans like it should. It felt like it was barely attached.
Upon inspection, I found a crack in the plastic ball socket:
So I zip tied it to the trans shifter bracket through the spaces between the hard plastic frame and the soft filler plastic. It held fine for about 1,000 miles, while I comptemplated the purchase of all new shifter cables for...
1 Comments
Gator Bite 01-19-2015 11:14 AM
Our Caymans are equipped with a Dual Mass Flywheel which does a really good job of eliminating gear chatter and providing us with silky smooth clutch engagements. But DMFs can and do fail. When they do they can create very strange sounds and/or vibrations in our cars. If you suspect a bad flywheel in your car, or if you happen to have the transmission out for some other reason like I did, make sure you test your flywheel as shown below.
1Needed Specialty Tools
Toothed Flywheel...
2 Comments
Gator Bite 05-08-2011 03:16 PM
Removing the Sport Chrono Stopwatch Housing
1. Slip a plastic protector between the rear of the stopwatch housing and the dash top. I made one out of a plastic water bottle ($0.05). This will protect the leather / plastic surface from scratches.
2. Slip a plastic wedge pry tool in between the layers of the protector and pry the back of the stop watch housing up. The housing is held down by 4 metal friction clips. Once the back two clips release, just rotate the housing and the...
5 Comments
Gator Bite 05-08-2011 10:03 AM
Removing the Driver Side Center Console Side Cover:
1. Remove the carpeted center console cover panel using a T-30 Torx driver on the screw that is hidden beneath the carpeting.
2. This will reveal two hidden screws that hold the Driver Side Center Console Side Cover in place. Remove these two screws using a T-20 Torx driver.
1 Comments
L8Apx 03-04-2010 11:29 PM
One of the known weaknesses of the Cayman is that when driven hard on the track, the power steering fluid can get hot, expand and can overflow out of the PS reservoir. :angry: (Note, if your car only sees street use, or mild track use, this will not be a problem for you.) There are multiple factors contributing to the PS fluid temperature: high engine RPMs which result in faster PS pump rotation which in turn heats the fluid, and the fact that the PS lines from the pump run near the left-side...
6 Comments
Rob VN 03-04-2012 07:47 PM
This article discusses the installation of the WEVO sport engine mount into a 2007 Cayman 2.7L shown here at Tarett's website: http://www.tarett.com/items/boxster~cayman-products/986-987-engine~transmission~brakes-/semi-solid-987-986-eng-mount-detail.htm. The sport engine mount can improve the responsiveness of the car. ( Witness the 981 with computer controlled mounts ) The result of this mod has quite an impact in the cabin: You will feel alot more vibration in the seat and the steering...
6 Comments
rogo 08-08-2020 05:31 PM
My 2014 Cayman S (36,000 miles) recently showed an error message indicating the dynamic transmission mounts had an issue. The dynamic transmission mounts come with the Sport Chrono option and tighten things up when the Sport Plus button is pressed. The error message was yellow and said it was safe to drive. I searched for documentation on the repair and couldnt find much, so I am attempting to detail what I did. I did not consult a repair manual, so there may be a better way to do this, but...
11 Comments
Heater Guy 10-12-2016 10:30 PM
Following the instructions for removing the Gauge Cluster:
1. Remove the trim under the gauges.
2. Remove the two screws that hold the gauge cluster to the dash.
3.Pull the gauge cluster out of the dash.
I spent a week pulling & pulling, but could never get enough force on the slippery plastic housing to disengage it from the clips.
Finally, after a lot of frustration, I taped a loop of strapping tape to the plastic housing and pulled like hell. It Popped out without causing any damage. ...
4 Comments
Rob VN 03-10-2014 01:05 PM
This article describes the installation of three all aluminum radiators made by CSF ( no affiliation ) on my 2007 Cayman 2.7L.
The radiators are welded things of beauty which promise to be more rugged than stock radiators and increase cooling capacity by 8 - 10% due to their design.
There are three part numbers involved:
CSF7047 Left Side Radiator
CSF7048 Right Side Radiator
CSF7049 Center Radiator
Four fresh O rings on the radiator hoses: Two pieces P/N 99610680107 and two pieces...
7 Comments
Rob VN 06-05-2011 07:07 PM
I installed the OEM fire extinguisher bracket in my 2007 Cayman recently. Here are the parts involved . Here is item 9, the bracket You will also have to buy some metric hardware: items 14 & 15 require a total of four M5-.80 X 16 bolts, lock washers and nuts; items 9, 10, 11 & 12 require three socket head M6-1.00 X 20 bolts and lockwashers. To start this caper you need to disconnect the battery, cover the sill plate with a towel and remove the driver's seat. Once the seat is out the three seat...
9 Comments
timbucthree 07-07-2013 05:24 PM
The fuel gauge in my 07 Cayman S has always behaved a little strangely. Recently, after filling the tank, the gauge in the dash showed empty (needle bottomed out) and a low fuel warning message was displayed; this even though the tank was 100% full. In the past I had noticed that the fuel gauge needle would take a very long time, sometimes overnight, to respond to totally (or partially) filling the fuel tank. This time however after driving the car back and forth to work for a number of days;...
6 Comments
KineticFlow 09-28-2013 08:49 PM
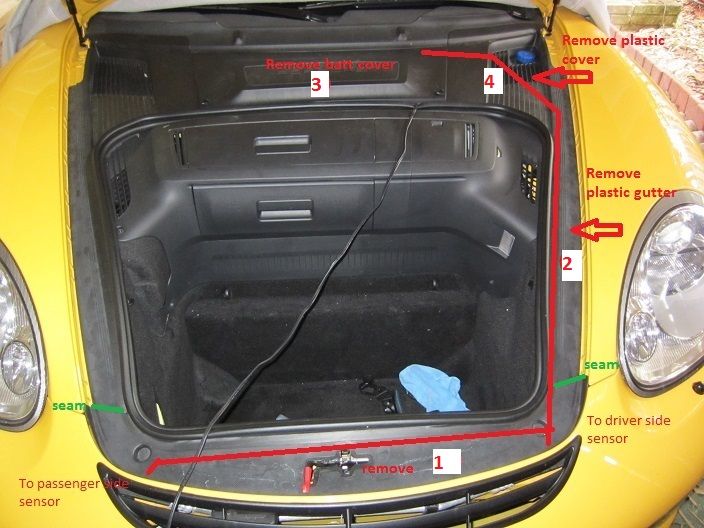
This article details the installation of the Parking Dynamics parking sensors on the rear bumper. Sometimes it can be a bit difficult to see behind a Cayman / Boxster in a parking lot, especially if you have GT2 seats or other track modifications. The Parking Dynamics solution is a very affordable ($150 for the rear plus your labor) hole free way to retrofit parking sensors onto our cars. It does not connect with the PCM or stereo so no warranty voiding or integration issues to deal with.
...
4 Comments
Left Hander 12-20-2010 12:53 PM
How to Adjust the Closed Window Height
(this was on my 2003 Boxster S, I would think the 987 Cayman shared the same but not sure)
Overview:
The door windows drop down when you lift the door handle and automatically go backup once the door closes. This is done to relieve the cabin pressure and to make it easier to open and close the door.
I recently had problems with MY closed window height being too high and catching on the roof. I learned that there is a height adjustment screw...
5 Comments
L8Apx 05-25-2011 04:46 PM
This article describes how to replace the Cayman/Boxster stock oil pressure alarm switch with the dual purpose oil pressure alarm switch and oil pressure gauge transducer used in the Porsche 996 cars. The oil pressure transducer output can then be connected to a standard VDO oil pressure gauge or used to monitor oil pressure via a track data acquisition system (such as the Traqmate) or trigger an alarm using an external circuit to detect the desired alarm pressure level.
Many Cayman owners...
4 Comments
Left Hander 02-24-2011 08:44 PM
Installing Headlight Protective Film
If you take your car to the track then you may be interested in protecting your headlights from the grit, rubber marbles, and misc bits which can be thrown up by the cars in front of you. No doubt you have seen cars with blue painter's tape on the headlights. I personally went this route for a while before deciding to put clear protective film on the headlights. This saves time at the track and makes for better pictures of your car! (I also think if you...
17 Comments
ApexL8 12-04-2011 04:52 PM
I put a diagram together for engine cylinder and bank numbering because I always forget. This should come up in future searches. Thank you to Greywolf for the original picture. Firing Order is 1 - 6 - 2 - 4 - 3 - 5.
Chuck
6 Comments
Gator Bite 02-03-2015 03:50 PM
A clutch slave cylinder should last a long time. But there have been incidents of slave cylinders leaking in Caymans, which can leave your clutch pedal on the floor. There was a Workshop Campaign (W802) back in 2008 to replace more than 1,200 bad slave cylinders that made their ways into cars (987s and 997s).
Should you find yourself in need of a new slave cylinder, this article should be of great help to you.
1Torque Values
Fastener LocationDescriptionTool SizeTorque ValueClutch...
7 Comments
Bill Lehman 06-18-2010 08:28 AM
You may have heard how much fun, and possibly addictive, our Drivers Education program can be and have decided to give it a try. Ive recently returned to the track after an extended absence and in conversations with other students have found that a better understanding of tire pressure could be helpful. Our Drivers Ed manual addresses various brake fluids and pads but I have added some detail about specific fluids and boiling points as well as some pad choice considerations.
4
Tire...
CrocZilla 05-02-2011 11:44 PM
What??? A torque converter in a Porsche you say?! Well I have one of those and all the Porsche dealer service techs I've talked to claim that the ATF fluid in the tiptronic transmission is a "lifetime" fluid and the flush interval/filter change is 108K miles or 12 years whichever comes first.
Now I track my cayman and I'm a bit skeptical of the lifetime quality of this fluid since oil/lubricants break down eventually owing to heat right? Also, during my online research I found that the same...
17 Comments
Rob VN 03-26-2013 09:59 AM
This article describes the installation of the Rennline adjustable gas pedal Revision 4 into my 2007 Cayman 2.7L. I don't know what revisions 1 - 3 were about. This unit raises the gas pedal with respect to the brake pedal to allow better heel and toe action. The unit consists of a base plate, pedal extensions, a pedal housing ( under the pedal extensions ) and a hinge bracket shown in the following photos. The parts are nicely machined from aluminum.
The installation took about...
9 Comments
Rob VN 08-19-2012 10:46 AM
This article describes the installation of a trans axle oil cooler onto my 2007 Cayman 5 speed. I was inspired by Al Norton's article on RENNTRACK.com where he added a water to transmission oil cooler to his 996 Turbo. It is reversible ( no drilling of the transaxle case ). The trans axle oil cooler is a longevity modification for track operation since our Cayman trans axles are bathed in heat from both the engine and exhaust system. The system consists of an air to oil cooler, oil pump,...
14 Comments
Rob VN 01-01-2015 08:07 AM
Shown on 5 speed 987.1.
I cut a 1 3/4 inch access hole in the plate under the trans axle to easily get to the drain plug. The other thing to note is the 6 speed trans axle gets filled to the bottom of the fill port while the 5 speed transmission requires the level to be diabolically set lower than the fill port by 11 mm. The five speed drain plug requires a special 16 mm triple square anti tamper socket I got from Pelican Parts. The six speed drain plugs are more rational, using 10 mm hex...
11 Comments
pcormier 10-14-2012 03:51 PM
Today I replaced the Window Regulator in my passenger side door. It took me about four hours, including eating lunch, doing some laundry and taking crappy photos of the job. This is not a difficult job, nor does it require any special tools other than the trim removal tools and some smaller torx drivers. I think I used 20, 25 and 30, but I'm not sure. It is a little tricky maneuvering the broken Regulator and the replacement regulator behind the partially disconnected inner metal door panel....
9 Comments
DaveD 07-12-2010 02:11 PM
Not long after starting my DE addiction, I started hearing stories of Cayman owners who had problems with the power steering system overheating at track events. In an effort to avoid this fate, I took a look at what could be done to improve cooling with a minimum of effort and expense.
The stock power steering cooler is a length of metal tubing under the car. This is very similar in size to the cooler on my Audi S4. The difference is that the Audi has the cooler loop behind the grille of...
9 Comments
K-Man Isle 09-06-2012 08:19 PM
First, you should read the article Replacing Engine Oil and Filter written by Gator Bite. The directions and photos in that article will be invaluable for changing oil and filter on your Gen 2 Cayman as there are only a few differences.
Second, although I have changed quite a bit, this article is adapted from an article by Helo Driver.
If you have changed oil and filter on your Chevrolet or Ford, you should be able to change them on your Cayman. I might, however, caution that your...
38 Comments
KS-CS 08-31-2013 11:24 PM
I still love my 2006 CS with Tiptronic, but over the last couple of years, I have thought that the 987.1 style Tiptronic steering wheel with the triangular airbag, was starting to look a bit dated. I have also long wished that the car came with a traditional paddle-shift steering wheel, rather than the older style Tip buttons.
I was aware that some 1st generation Tip owners had successfully swapped their old style steering wheels, for the sport wheel with paddles, however, the cost of...
8 Comments
Gator Bite 05-17-2011 03:01 PM
Maybe you want to install a fixed Cayman R spoiler, a Cayman Interseries spoiler, or maybe you need to remove your rear bumper cover. Either way, you'll need to remove the electric spoiler first. Here's how....
1). Raise the rear spoiler by turning on the ignition key and pressing the 'Spoiler' button.
2). Remove all seven T-20 Torx Screws from under the front edge of the spoiler. (I highly recommend a Skew-Driver for this task.)
7 Comments
His987CS 04-17-2018 07:48 AM
The flexible brake lines that connect the calipers to the brake line hydraulic system are subject to wear and should be replaced periodically. This article provides a guide on how to replace the brake lines on a Cayman. In this article I replace the factory brake lines on my Cayman with new Braided Stainless Steel Brake Lines.
Braided Stainless Steel Brake Lines are a relatively inexpensive way to improve the feel of your Cayman's brakes.
The intent of braided stainless steel brake lines...
8 Comments
KS-CS 01-31-2015 07:59 PM
I was getting something out of my front trunk (frunk) a couple of weeks ago, when the hood fell on its own hitting me in the head. No damage done, but I realized that it must be time to replace the gas struts. I'm not sure when they started losing their pressure, but after I installed the new ones I immediately noticed that they spontaneously raise the hood from about 60% to full open by themselves - I don't think mine had done that for some time, so if yours aren't doing it either, it's...
17 Comments
pkaia524 07-01-2020 08:38 PM
Having watched a few YouTube videos on this repair, I fixed both door panels on my 2014 981 in one day. Total working time was around 90 minutes for both panels, not counting drying time.
Since I was dubious about trying this DIY (first time Id ever done a DIY on an interior finish panel) I thought I would share a few things I learned.
1. Its VERY easy. I recommend anyone with a small amount of mechanical skill and an average amount of patience to do this repair.
2. Tools/equipment...
11 Comments
kevinr 08-11-2012 04:41 PM
Expert Summary:
You can restore scratched or clouded plastic headlight lenses using a five step process:
Mask the sheet metal areas adjacent to the lenses
Using 236 grit sand paper, sand the entire lens to remove scratches and discoloration
Using 800 grit sandpaper, sand to the entire lens to uniform translucency
Use an ultra-fine wet sand pad to remove all visible scratches from step 3
Use polishing compound as final step to bring lenses back to crystal clear
14 Comments
Rob VN 08-19-2013 10:31 AM
This article describes the installation of the Vision Motorsports big brake kit for Cayman. Diver Dog had this kit installed previously. The advantages of this kit are ease of pad change, wide selection of pad choices and improved braking. Installation was straight forward, removing the stock calipers and rotors and replacing them with the new 350 mm AP rotors and 2004 GT3 6 piston calipers followed by a brake bleed. The kit consists of two new AP rotors, two new 2004 GT3 front calipers, two...
7 Comments
Gator Bite 04-07-2015 01:22 PM
If you ever have to run a wire to the back of a Cayman, you'll need to remove the Driver Side Sill Plate. I had to do so to run a wire for my Oil Pressure Gauge and I learned that unlike most cars where that plate is held down with just plastic friction pins, the sill plate on a Cayman is rock solid. It's held in with two rather substantial bolts. If you need to remove yours, you'll want to read on.
1Removal Procedure
1). There are two plastic plugs in the side of the sill plate between...
8 Comments
Flybot 03-22-2012 11:27 PM
.
I was inspired to paint some of the interior trim on my Cayman R after seeing a few pics of this factory Porsche Exclusive Peridot Green example.
After searching for as much info as possible on painting interior car plastics I settled on a plan. Sending parts away to a professional is an option, but expensive. Local shops may paint parts cheaply, but I dont think they take the proper time to do it right. I do not claim to be an auto body professional, but I did get...
17 Comments
KS-CS 03-13-2010 01:54 PM
I was bitten by the track bug at my very first DE experience, and have become something of a track junkie, needing my monthly fix at the track. As I have gotten faster, I have felt the need to add track seats and harnesses in order to hold me in place better. Without getting into the whole debate about the pros/cons of track seats and harnesses, with or without a rollbar, I decided that if I personally was going that route, I wanted some additional rollover protection.
At the time of this...
9 Comments
Gator Bite 05-08-2011 03:56 AM
Removing the Door Sill Trim Panel
1. Find and remove the two screw hole covers from the inside of the Door Sill Trim
2. There are two hidden mounting screws that hold the trim panel tight to the body. Using a 5mm Allen Wrench, loosen each of the mounting screws two turns.
14 Comments
Bill Lehman 08-04-2010 02:38 PM
I installed my RSS harness bar this past weekend. I like the structural design of this bar because its base plates mount directly to the body under the reverse lever using the factory hardware. There is also provision for the long leg of the reverse lever to go through the base plate into the body, adding more shear strength. If you look at the first attached photo, the reverse lever 10 x 25 bolt goes through the slotted hole. The leg of the lever goes through the large round hole. The two...
7 Comments
Bill Lehman 06-18-2010 08:06 AM
After attending your first autocross or drivers education event, its likely that youll be thinking about improving your cars handling. During discussions with other drivers and interested spectators you might be advised to get a track alignment or find a way to get more negative camber. This article will explain what the alignment parameters of toe, camber, and caster mean and how changes in their settings may affect performance. Finally, Ill discuss the benefits of having a wheel...
7 Comments
KS-CS 03-12-2010 10:06 PM
I had an unfortunate little run-in with a curb while driving in the snow this winter, which damaged the plastic trim piece (deflector) which sits in front of the rear wheel, as you can see from the picture below:
To replace it, I ordered a replacement part from Suncoast here: Wheel Arch Trim Replacement for about $24. I figured it would be pretty straightforward replacing it, and for the most part it was. However, I have learned through my modification adventures, that reinstalling...
12 Comments
Rob VN 12-03-2011 09:59 PM
3/16/13 Update: I recently received an email from RSS stating that one should perform regular inspections of the LCAs and that they had sent updated heavy duty LCA ball joint pin rebuild kits (P/N 380) free of charge.
I spoke to Mike Schalke at RSS today and he explained that they were doing this to educate RSS LCA users that they need to inspect and replace wear parts on the LCAs regularly. Apparently a customer used the RSS LCAs in one car for a season and then removed the LCAs and...
8 Comments
jetstreamer 12-30-2020 09:33 PM
I still don't quite understand how it works, but here are the innards:hmm:
Although the AOS looked OK to me (except the torn membrane), the Plenum was pretty nasty:(
8 Comments
Gator Bite 05-17-2011 06:47 PM
Removing the Rear Bumper Apron
Warning: This procedure is best performed with two people. Removing the apron is not difficult, but it does require some bending and pulling on the apron. Attempting to do this alone may result in damage to the painted surfaces.
1). Remove the Rear Spoiler
2). Lower the Rear Spoiler Actuators
3).Remove the Tail Lights
9 Comments
babbo 09-02-2010 11:42 AM
Heres my take on carrying a spare and transporting a flat in a Cayman (I'd previously posted a version of this article at www.planet-9.com). I started with the complete spare kit sold by Sunset in Oregon, Suncoast in Florida and other Porsche dealers:
996 362 020 04 Vredestein Inflatable Spare Tire & Wheel
996 722 101 00 Foam Wheel Insert to hold Jack
996 721 211 00 Scissors Jack with Handle
987 722 061 00 Cover for Spare with plastic Backing Disc & Straps
MOUNTING A SPARE
8 Comments
Rob VN 07-21-2013 02:27 PM
This article describes the installation of an electric power steering pump kit into my 2007 Cayman 2.7L. The GSR Autosport Electric Power Steering pump kit I chose ( no affiliation ) allows replacement of the engine mounted power steering pump and lines with a Porsche Motorsport electric pump and new hose set.
GSR Autosport is now Trinity and no longer stocks this kit. Reports are the pump can be purchased from Achilles and RS1. BILT Racing ( no affiliation ) also sells an electric PS pump...
12 Comments
Bill Lehman 01-24-2014 12:09 PM
The Getty Cayman RS Wing is a smaller version of the wing used on the GT3 RS. It is an anhedral wing design. The leading edge tips are lower that the center section. This allows a lower angle of attack for the center section which is running in the air flowing down the back of the rear hatch. The ends are running in a more direct air flow and are at a greater angle of attack. Getty built the aero components for the Cayman Interseries race cars and I like their proven wing base. I placed...
3 Comments
Bill Lehman 12-18-2014 02:20 PM
At some point during your development as a track driver you will want to find a way to measure your progress and collect data to analyze your driving. Early lap timers sensed a beacon placed along trackside to measure lap time. Sophisticated data systems used a variety of sensors placed on the engine and chassis to gather data.
Today there is a large selection of devices using only GPS to gather lap times and, knowing speed and location, calculate lateral and longitudinal G-Force. ...
10 Comments
lithium1330 06-28-2012 09:16 PM
987.1 Center console removal/Shifter Install DIY Guide
Desertdrew wrote a detailed article on the schnell short shift install - great guidance. Though, there were a couple of steps that could be eliminated (keep knob/boot in 1 piece & remove console by undoing just 1 electrical plug) to simplify the process.
Note some of the pictures are rotated the wrong way - I couldn't fix them. However, you can download the PDF (pictures right-side up) here: https://www.box.com/s/25aa98e5bdceda3589c0...
3 Comments
Santa Fe 03-24-2010 06:59 PM
Interior
Check interior for damage (esp. driver area) ___________________________________________
Check Owners literature and maintenance manual ______________________________________
Check switches for seats, seat-heating etc. for damage __________________________________
Check that clock, Radio and CD work__________________________________________________
Check seat belt operation __________________________________________________________
Exterior
Carry out body and paint...
14 Comments
Flybot 07-15-2012 10:27 AM
I decided to make my own grill mesh to fill in the gaping holes in the rear bumper of my 2012 Cayman R.
This is a very simple DIY and I did it in a few hours and for about $50. I think it turned out great.
First, after much google searching and getting real smart on what kind of different mesh materials are available such as perforated, woven, or expanded, plastic, aluminum, steel, brass, etc, I came across the perfect material that I think looks much more finished than the expanded mesh...
1 Comments
Gator Bite 05-17-2011 06:03 PM
Removing the Tail Lights
1). Remove the Tail Light Cover by rotating the locking pin 1/4 turn and pulling the Cover off.
2). Remove the electrical plug from the tail light by squeezing the release tabs and pulling the plug out of the tail light.
20 Comments
desertdrew 08-19-2011 09:26 AM
Schnell Short Shifter Installation
(Shown on 2006 Cayman S with 6-speed, Bose system, no Nav or PASM)
Special mention – I used this very helpful and very thorough DIY installation instructions as a starting point http://billswebspace.com/Porsche987ShortShiftDIY
All instructions for a short shifter kit, on web sites or from the manufacturer were for the Boxster or Caymans with a Nav system. As I proceeded with the install, there were differences in my cars actual parts and those shown...
8 Comments
adsalmon 02-07-2015 02:45 PM
This was a DIY I did a couple of years ago. Still holding strong. Shared on the "other" website years ago.
-1 piece of Pink Board Backing. Home Depot $8 to $10 bucks... They can cut it up on site to fit in your car...
-1 yard or so of Black (or your choice) felt fabric... Might cost you $5 bucks a yard.
-Some electrical wire.. Likely have this laying around...
Cut the Pink Board to the shape of the "trunk/frunk area". I used some wrapping paper to lay across the opening of the...
Voyager6 04-20-2016 10:47 PM
Attached is a PDF describing how I removed my rocker panels, drilled for the GT4 vent covers and installed them successfully.
Enjoy
V6
5 Comments
Flybot 01-29-2012 10:35 AM
Hello Excel geeks. Ive been using excel for years to track my cars maintenance history. I finally got around to adjusting the file for my Cayman. This file is set up for a 2012 Cayman, and I know the Porsche recommended service intervals have changed several times over the years. It can be adjusted easily if you know anything about excel.
Here is a link to the files section of this web site for download (or go to Photos and files/files section/misc)
...
9 Comments
autox10 11-25-2014 03:12 PM
One issue with the Cayman is the reflection of the upper dash in the windshield. If you havent noticed, stop reading now and dont think about it again. It is naturally more pronounced with the lighter, sand beige, interior than darker colors. I found that swapping the forward most sand beige parts of the upper dash, called defroster trim, for black doesnt completely eliminate reflections but does reduce them considerably.
Parts are: left defroster trim 997 552 175 01
...
14 Comments
Jim987 09-24-2016 09:01 AM
This article documents my installation of a complete data logging system in my Cayman S. I have chosen the AiM system not only because offers integration of ECU data and GPS data and a full software suit to configure and analyse it, but also coupling with their SmartyCam HD you get full integration of that data into a synchronized video without post production. You can watch your video with already integrated data on your laptop computer directly following an ontrack session. Here are the AiM...
22 Comments
ApexL8 07-25-2014 12:15 PM
This article is a quick look at how to remove the accessory drive belt on a 987.2 or 981 Cayman, 9A1 DFI, since it is slightly different from the earlier M97 engine configuration.
Please see:
Cayman Register Forums > Articles > Maintenance & Repair > Accessory Drive Belt Remove/Install
...for a full description of the procedure on a 987.1 (MY 2006-2008). Theory, warnings, etc. carry over to the later models.
4WARNING: Mark the direction the belt travels if you plan on reinstalling...
1 Comments
papa987 07-13-2015 08:50 PM
Vehicle: 2006 Cayman S
Why this system? I wanted a valved system with a bit deeper growl, with a richer sound going through the gears and the gurgle when decelerating. I also wanted no/minimal drone during cruising and a good looking, high quality construction and finish. This system allows me to enter/leave the neighborhood without waking everyone as I head off to cars and coffee or the Blue Ridge Mountains, but when switched to the louder mode, sounds very exotic and rewarding,...
3 Comments
His987CS 04-11-2018 01:01 PM
As many of you know, 987.1 Caymans came with no front or rear brake caliper/rotor cooling ducts. This can be problematic for cars that spend a lot of time on the track. Cooling of the front calipers and rotors can be handled in a very straight forward manner by using 997 GT3 front cooling ducts. The 997 GT3 front cooling ducts are inexpensive and are a drop-in part for the 987.1.
The rear cooling duct is a little more complicated, but not too much more. Also, although there are other ways...
7 Comments
greenfrog 02-01-2015 09:28 PM
Three years ago at my very first DE, my instructor said he knew I would come back, and I should make improving the safety equipment a priority. Since then, I have gained plenty of seat time, but have been guilty of putting off the safety upgrade. Last November at VIR, I got a cramp in my left leg for bracing against the dead pedal through turn 1. I bought a CG Clamp on site. It helped a lot, but does not appear to be practical for street use. That's when I decided I need 6-point harness,...
5 Comments
His987CS 04-27-2018 06:42 AM
This Article provides a guide on how to rebuild the brake calipers of a Cayman S (987.1S). The instructions in this article can apply to other Porsche models that use Brembo alloy monoblock painted brake calipers as well. The only variations will be in the size and number of pistons, seals, and dustboots. Otherwise the instructions presented here should be very similar. This guide should not be used for Ceramic Brakes.
Warning
Brakes are a critical system on any vehicle. On a performance...
12 Comments
Gator Bite 01-16-2010 06:43 PM
Properly breaking in your new brakes is essential to their continued performance and reliability, yet it's something that few people really understand. I've recently followed a very informative thread where several of our members were trading some pretty good information on this topic. I found the information was so valuable, that I thought it would be a good idea to archive it here as an article.
Special thanks to all the members who contributed these really cool links:
Bedding...
3 Comments
Gator Bite 01-10-2010 02:05 PM
Let's face it, there are times when you just can't prevent the installation of a front license plate, which unfortunately comes with irreversible damage to the nose of your car. For me, it was tourist delivery that made it necessary for my front bumper to be drilled. This wouldn't be so bad if they didn't just blow screws into the plastic, but that's what they do, and the tension from those screws distorts the plastic around the hole into a volcano like head. Lucky for us, there are Bumper...
13 Comments
LarryHughes 07-10-2017 04:29 PM
My new-to-me 2009 987.2 has 40,000 miles and it is time to change the spark plugs. Although there is no problem, IMO it is wise to change plugs to prevent them from galling to the cylinder head. I offer this little guide as there doesn't seem to be any 987.2 plug change instructions on the site. Mine is a base 2.9 liter but the S models will be very much the same.
Tools you will need include a 10mm socket, a 10mm ET socket (external torx), an assortment of torx wrenches, and a spark plug...
8 Comments
Gator Bite 01-22-2015 10:58 PM
We've heard a lot of talk about Rear Main Seals leaking in Porsches, but as the Cayman Register advocate I can't say that I've seen many members who've experienced a failure. That's likely because Porsche made a major improvement to the seals in 2005 and all Caymans received that new seal. The RMS in my car didn't leak, but I decided to replace it anyway because I was replacing my IMS cover seal. My car had 80,000 miles on it, I was right there with 95% of the labor already done and the new RMS...
23 Comments
Mark C. 01-30-2010 01:33 AM
Does anyone know how to remove the middle console storage box lid (armrest)? Any help or leads are much appreciated.
17 Comments
ApexL8 03-14-2010 04:34 PM
This is a very basic procedure, practically not worthy of an article, but it does bear mentioning that you must remove the upper engine cover to access the power steering fluid reservoir. So, even if you are not having any problems, every time your cover comes off go ahead and check your fluid level. Many people use the abbreviation PS for "power steering", which fact may aid you in future searches.
It might have been a nice feature if Porsche had included a little door you could pop open...
15 Comments
ebarthelmes 04-29-2017 12:14 PM
I was about to wash down my wheels to remove some brake dust and grime when looking into the wheel well I happen to notice that the rear lateral support arm channels for the rear suspension reinforcement plate were full of gravel. These channels have two U shaped groves in the outer edges and obviously are a settling point for dirt and gravel (see attached pictures). So before washing I wanted to get rid of this material so it wouldnt retain any waterand contribute to corrosion in the...
15 Comments
251bill 01-04-2018 09:57 AM
This document describes replacing the Air Oil Separator(AOS) for a 987.2
The design of the part that attaches to the motor casing is slightly different that other Porsche AOS.
There are two round stubs that have o-rings on them, so no more hose clamps.
Otherwise, it seems very similar to previous AOS designs.
Two bolts on the AOS, E10 torque 13Nm(9.5 ftlb.)
Here are the steps to replace the AOS:
1) Remove the top access hatch.
20 Comments
|
|
|